Flooring & Tile
How to Measure a Room for Flooring
A floor is bought by area, so the order is only as good as the dimensions behind it. Here's how to take them, how to handle a room that isn't a rectangle, and what to leave out.
Measure the floor, not the room
Flooring is bought by area, so the whole estimate rests on a pair of dimensions. Take them at floor level, along the floor itself, rather than at waist height across the middle of the room. Baseboard, skirting, pipe boxing and a bowed wall all change the number between one height and another, and the one you need is the surface the planks will actually sit on.
Rooms are rarely square. Measure the length at both ends and the width at both ends, and if the pairs disagree, work from the larger of each — the floor has to reach the widest point, and the surplus is trimmed off at the narrow end. A difference of a couple of inches over a wall is normal in an older house and is not a measuring mistake.
Record feet and inches as you took them and convert once, at the end. An 11 ft 6 in wall is 11.5 ft, not 11.6 — that slip inflates a room by more than it looks, and it compounds when the same wall is used twice in a perimeter.
Break the shape into rectangles
Any floor plan made of straight walls can be split into rectangles, measured separately and added together.
Sketch the room first, roughly to shape, then draw the lines that cut it into rectangles. An L-shaped room is two. A rectangle with an alcove or a bay is the main floor plus the alcove. A chimney breast turns one wall into two shorter rectangles either side of it. Write the dimensions on the sketch as you measure, and label each rectangle so you can check the arithmetic later without measuring again.
The one rule to hold onto: every part of the floor belongs to exactly one rectangle. Where two rectangles meet, the dividing line goes through the middle of the doorway or the alcove mouth, and neither rectangle crosses it. Double-counting the overlap is the usual way an otherwise careful measurement ends up several square feet too large.
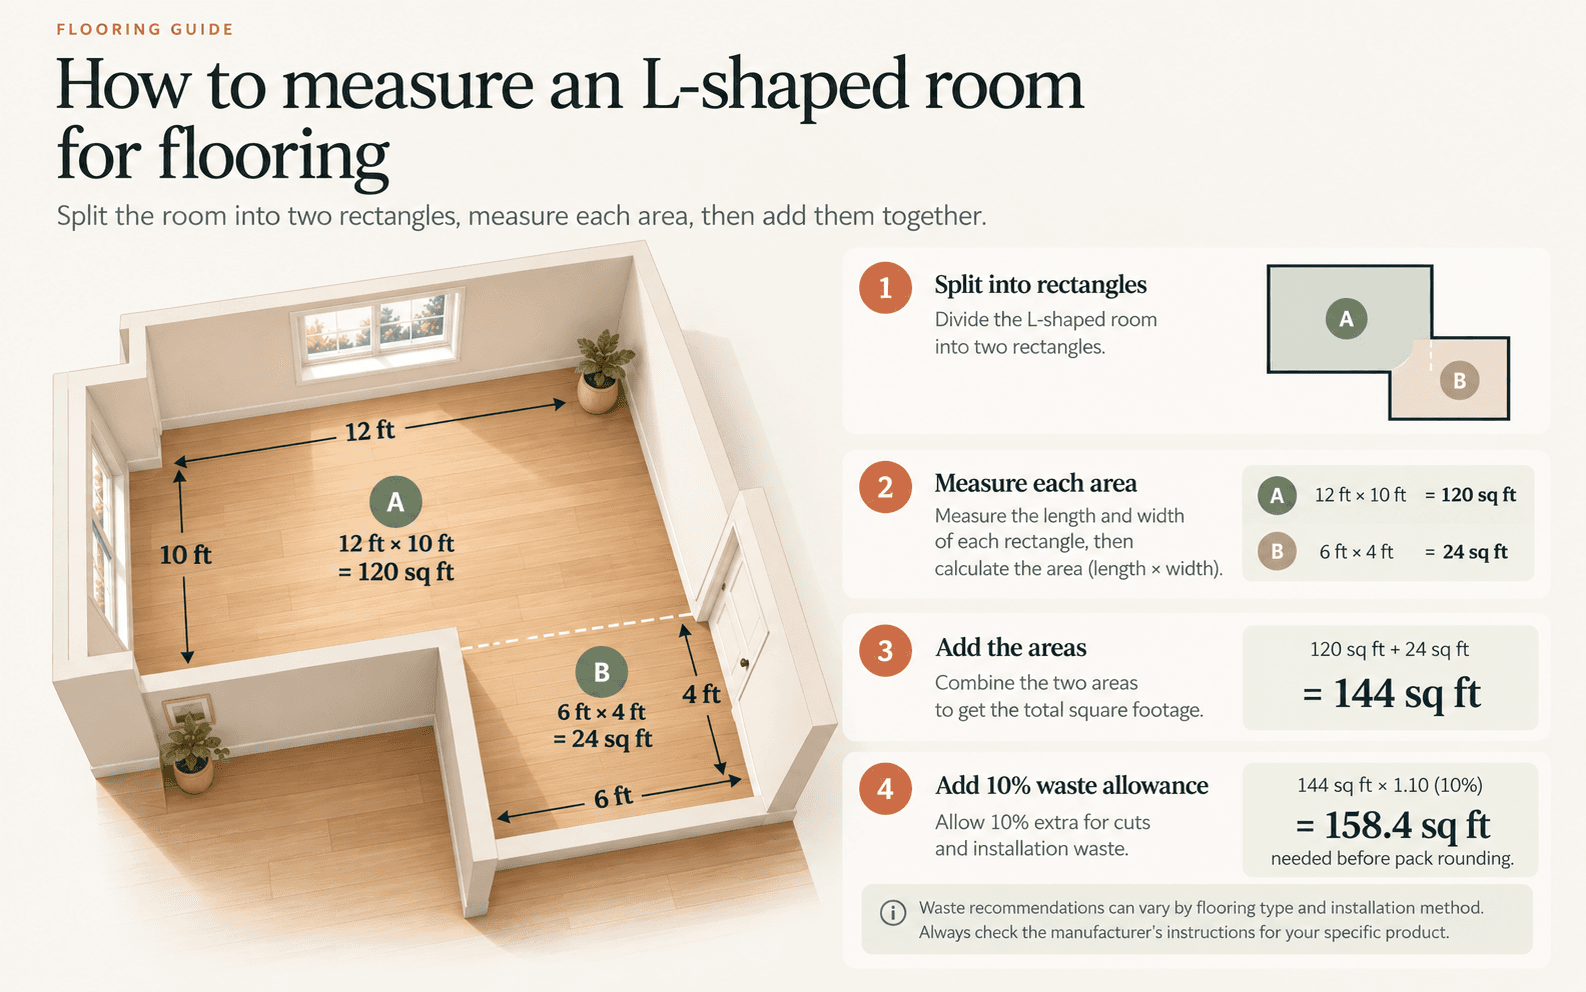
The Flooring Calculator takes each rectangle as its own row and adds them for you, so the sketch transfers across directly — one row per rectangle, no need to total them by hand first.
Alcoves, thresholds and where the floor stops
The edges are where a measurement goes wrong, because they're where you have to decide what counts as this floor. A few cases come up in nearly every room.
- Alcoves and bays
- Measure the alcove from the face of the wall it breaks out of, not from the back of the main room, and measure its width at the mouth. It becomes its own rectangle. A bay with angled sides has no rectangle that fits it exactly — take the rectangle that encloses it, which buys a little extra for the angled cuts you'll be making anyway.
- Doorways and thresholds
- Decide where this floor ends and the next one begins, and measure to that line. The usual choice is the middle of the doorway, under the closed door, which is where a threshold strip or transition profile sits. Whatever you pick, use the same line for the room on the other side so the two estimates don't overlap or leave a gap.
- The door swing and the recess
- The strip of floor inside the door frame still needs covering, and it's easy to leave out because it sits outside the room's four walls. Add it as a small rectangle — the width of the opening by the depth of the frame — for each doorway.
- Closets and fitted wardrobes
- A walk-in closet or a wardrobe you're flooring under is another rectangle. One with a fitted base that sits on the subfloor isn't, and gets left out rather than subtracted. Decide from your installation plan, not from the room's outline.
What to subtract, and what to leave in
Subtract a fixed feature only when you are certain the floor will not run under it — a kitchen island on a built base, a hearth, a bath panel, a tiled shower base. These are real area you would otherwise buy and never lay.
Leave everything else in. A pipe, a radiator leg, a toilet pedestal or a door frame each take a cut rather than a saving: the plank is still consumed, the offcut is usually the wrong shape to use elsewhere, and subtracting the few square inches they occupy would quietly reduce an order that those same obstacles have just made more wasteful. Anything that can be moved — free-standing furniture, appliances that slide out — is floor, and gets measured as floor.
The expansion gap around a floating floor is the case people expect to subtract and shouldn't. The gap is left at the perimeter by stopping the planks short of the wall, then hidden under the baseboard or a bead, so the planks still have to span the full room dimension you measured. Follow the gap the manufacturer specifies for the product and the room size; it changes how you fit the floor, not how much of it you order.
Write it down so you can reuse it
The sketch with dimensions on it is worth more than the total it produces. Quotes get revised, products change and underlay, baseboard and threshold strips all need the same numbers. Keep the rectangles and their measurements, not just the square footage they added up to — a bare total can't be re-checked, and it can't tell you the length of the longest run when you're deciding which way the planks go.
Note the room's perimeter while you have the tape out, since that's what baseboard and beading are sold against, and note which direction you plan to lay the planks. Plank direction doesn't change the area, but it changes how many cuts you make and how much of each offcut is reusable, which is a waste-allowance question rather than a measuring one.
From area to packs
The measurement is the hard part. Turning it into an order is three steps, in this order.
Add the rectangles for the gross area, subtract anything the floor genuinely won't run under for the net area, then apply the waste allowance to that net figure. Divide by the coverage per pack printed on the packaging and round up, once, at the end. Rounding earlier — per rectangle, or after the waste — overbuys for the same reason it does with paint or tile.
What the allowance should be isn't a measuring question and there's no figure that fits every room; it depends on the layout, the plank size, the number of cuts and the manufacturer's own instructions. How much extra tile should you buy? works through what an allowance is actually paying for, and the same reasoning applies to flooring sold by the pack.
A worked example
An L-shaped living room with an alcove and a fixed unit to leave out. The 10% allowance and the 20 sq ft pack are assumptions chosen to make the arithmetic concrete — use your own product's coverage figure and an allowance judged from your own layout.
- Main floor
- 12 × 12 ft
- Alcove
- 3 × 4 ft
- Fixed unit base
- 6 × 2 ft
- Waste allowance
- 10%
- Coverage per pack
- 20 sq ft
- Main floor12 × 12 = 144 sq ft
- Alcove3 × 4 = 12 sq ft
- Gross area144 + 12 = 156 sq ft
- Excluded base6 × 2 = 12 sq ft
- Net area to floor156 − 12 = 144 sq ft
- With 10% allowance144 × 1.10 = 158.4 sq ft
- Packs needed158.4 ÷ 20 = 7.92 → 8 packs
- Coverage bought8 × 20 = 160 sq ft
Buy 8 packs — 160 sq ft for a 144 sq ft floor.
One round-up, and it comes last: 7.92 becomes 8. Two rectangles added, one exclusion subtracted, and the allowance applied to the net figure.
The 16 sq ft beyond the floor is not 16 sq ft of spare flooring. Roughly 14.4 of it is the allowance, and the allowance is there to be consumed — cuts at the walls and the alcove mouth, the offcuts that don't fit anywhere else, the plank that splits on the last row. Only about 1.6 sq ft came from rounding 7.92 up to a whole pack. What you keep for a future repair is whatever survives the job, which is some part of that 16 rather than all of it, and on a cut-heavy floor it can be very little.
That's worth checking before you assume the order has spares in it. If you want a length of matching plank put away — and a later batch may not match — count what the layout is likely to eat first, and add a pack deliberately if the remainder won't cover it.
Note what didn't happen here: the alcove wasn't measured from the back wall of the main room, and the 12 sq ft base was subtracted only because the floor stops at it. Had the floor been planned to run underneath, the net area would have stayed at 156 sq ft — 171.6 with the allowance, 8.58 packs, and 9 packs to buy.
Common questions
How do I measure an irregular room?
Do I measure at the floor or at the wall?
Should I subtract kitchen cabinets, an island or a hearth?
Do I subtract the expansion gap?
Where should the floor stop in a doorway?
My walls aren't square — which measurement do I use?
Further reading
Where the figures for your own floor come from:
Coverage per pack, the expansion gap, subfloor preparation and the acclimatisation the product needs are all specific to what you're buying, so there's no general figure worth quoting here. The authorities for your order are the packaging and the manufacturer's installation instructions for that line.